Tables
Tables can be used to organize data into rows and columns. In WordPress they look similar to this:
| a | b | c | d |
| e | f | g | h |
| i | j | k | l |
| m | n | o | p |
1. To insert your own table, make sure that the entire toolbar is showing (if it is not, click the Toolbar Toggle button on the right side of the toolbar) and then click the Table button.
2. Select the Insert table option and then choose the size of the table. You can choose the table’s size by mousing over the grid until it is the correct size for the table that you need.
3. Once you have clicked on the size you want, the table will appear at your mouse cursor.
The new table will appear small and compressed, but you can expand it by dragging the white boxes on the edges and the sides. 4. To begin adding content into your table, simply click the cell you want and begin typing.
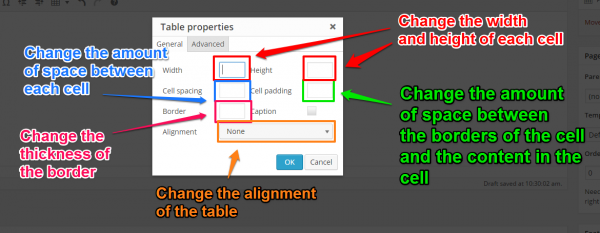
5. While you have the table selected, you can also change table’s properties by clicking on the Table button again, but this time select Table properties:
Here you can change the width and height of each cell, the space between each cell, the padding, the thickness of the border around the table, and the alignment of the table.


